Monday, December 14, 2020


Welcome back and I have another entry for the "Winter Blues" challenge going on the whole month of December on theLost Coast Portal to Creativity

I made a fun Gnomes card for this entry using the 2 Gnomes stamp from Lost Coast Designs and the Resign from Adulthood clear stamp from Carmen's Veranda.  

For my first step, I created a white card base.  I then took a piece of dark blue card stock and using a "snow fall" die, I created what looks like a night sky with snow falling.  I attached that to my card base.  I stamped my gnomes with dark blue ink onto white card stock and colored them with green and navy blue Copic Sketch markers.  I then cut them out and attached them to the lower left corner with foam tape.

I stamped my sentiment onto white paper with dark blue ink and ran it through my printer to reduce the size to 75%.  I edged that with blue ink and affixed it to the upper right corner as shown.

Easy peasy and you gotta' love those gnomes! 
Happy Winter!


Tuesday, December 1, 2020

Winter Blues: A Boy and His Dog


Happy December to all!  I hope this finds you all safe and healthy and enjoying preparations for the coming holidays.

The monthly theme at the Lost Coast Portal to Creativity for the entire month of December is "Winter Blues".  In keeping with that, I have made a card using the Georges and Louis stamp, the  Small Snowflake Set, and one of the stamps from the ATC Miscellaneous Set #6, all from Lost Coast Designs.

I stamped Georges and Louis with black ink onto white card stock and cut them out.  I then restamped Georges's coat and hat with blue ink, cut them out, and superimposed them atop my original stamped image.  I added a bit of color to George's face and used a light brown marker to add some color to Louis.  I glued some enamel dots for buttons onto the coat and a white pompom on top of the hat.

I used a blue Oxide ink and a stencil to create the background.  I edged that with the same blue ink, then taking a couple of the snowflake stamps and the same ink, stamped snowflakes randomly across the background.  Using black ink I used one of the ATC set stamps and lightly and randomly stamped some script across the background.

I attached Georges and Louis to the card front and layered it with a white panel.

Hop on over to the Portal and enter your "Winter Blue" creations.

  The randomly drawn winner will win some free stamps!


Happy Holidays!

Thursday, November 26, 2020

Santa Gnome


I made this card for the Lost Coast Portal to Creativity "Festive Fun" challenge that is going on for the last half of November.  I used the Pompom Gnome stamp from Lost Coast Designs and the Dear Santa clear stamp from Carmen's Veranda.  

I started by going through my stash of Christmas papers and selecting some in the traditional red, green and white Christmas colors.  I then cut thin strips of each paper I had chosen and glued them to a piece of white card stock.  When I was done I had a piece more than twice this size so will have some left over for another project.  I trimmed up the edges then using my sewing machine stitched around the border.  I then layered this with a white card base.

Next I stamped my gnome onto white card stock with black ink and colored his suit and hat red, his nose pink, and his shoes black.  I cut him out and glued him to my card front as shown, and then   attached a pompom to the tip of his Santa hat.  I stamped my sentiment with black ink onto white paper, and because my card is rather narrow, I reduced the size on my printer and printed out a copy which I then cut out and outlined with black ink.  I affixed this to the upper portion of my card front, and that's a wrap!

Come join the "Festive Fun" on the Portal for a chance to win some free stamps!


Thursday, November 12, 2020

Spooktacular Florals


Hi again with another project for the current Lost Coast Portal to Creativity challenge:  Spooktacular Florals.  I made three ATCs for this, each featuring one of the DOD skulls from the 3 Small Skulls Set of rubber stamps from Lost Coast Designs.  

All three of my backgrounds are scraps of prints I have made for various projects including two Gelli prints and one stenciled print.  On the turquoise one I have used the Bubble Background stamp along both edges, and on the green and red I used the Loopy Background stamp across the whole background.

I stamped each of the three skulls onto white card stock with black ink and cut them out.  I then colored each with brighter shades of Copic Sketch Markers.  I added some bling to the eyes of all three skulls - sequins, flowers, glass pebbles, etc.  I then attached each to one of the three backgrounds I had chosen, two of which include some LCD background stamping.

I love Day of the Dead designs and colors to was excited to have a chance to use these 3 DOD skull stamps.


Sunday, November 1, 2020

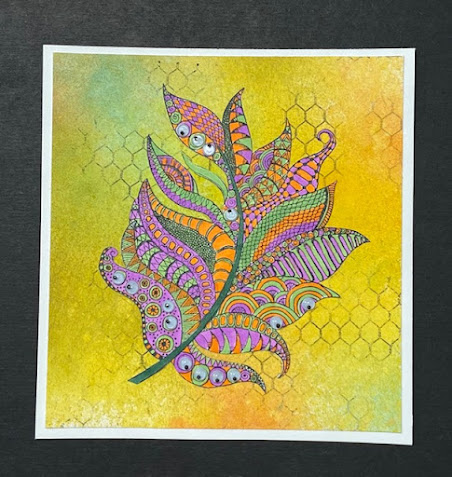
Spooktacular Florals: The Eyes Have It


This project is for the new Spooktacular Florals Challenge that begins today on the Lost Coast Portal to Creativity.

 This was made with the Large Chickenwire Background stamp on a background made with Distress Ink Sprays in shades of yellow, green and orange. The background was stamped with black StayzOn ink, just randomly here and there.

I stamped my leaf with black ink onto white card stock, and using Copic Sketch Markers, I colored it in purple, green and orange.  It took some time but was really fun - if you are one of those who likes adult coloring books, this is the stamp for you!  I cut the leaf out and adhered it to my background panel.  I then glued on some little googly eyes to make my leaf "look alive".  Final step was to layer it with a white panel.

Be sure to check out the Portal and enter your creations.  
 You could win some fabulous free rubber stamps!


Friday, October 23, 2020


Hi again with another project for the month long Halloween celebration at The Lost Coast Portal to Creativity.  And right now, as part of that celebration, they are featuring your favorite Halloween furry friends.

I made a tag for this project featuring one of the stamps from the Party Cat stamp set from Lost Coast Designs.  I stamped my cat onto a piece of coffee dyed paper using black ink.  Before I cut him out, I used a black marker to completely color in his party hat and added a brim on either side to make it look like a witch's hat.  Then I fussy cut him out.  

I restamped the part of his face where his eyes are onto a white paper scrap and cut that out, superimposing it over his originally stamped eyes.  I colored those eyes with a bright green marker then glued a little kitty Halloween mask over his eyes.  I hope you can see that color in his eyes on the attached photo.  

For my background, I used a Gelli print I had on hand using some orange acrylic paint and a stencil that looks a bit like a starburst.  I cut that into a tag shape and edged it with Distress Ink.  I glued my kitty witch as shown and added a gold star to his pointy hat.  

Next I used a banner die and black paper to cut a little party banner.  Using letter stickers, I spelled the word MAGIC on the banner and attached it to the upper part of my tag.  Some orange ribbon and a bunch of stars and sequins in gold and orange complete the tag.

So get out your rubber stamps and enter your Furry Friend Halloween projects for a chance to win some free stamps!  


Monday, October 19, 2020

Furry Friends Halloween


This project was made for the Lost Coast Portal to Creativity Furry Friends Halloween challenge and features the Circus Dog Stamp Set from Lost Coast Designs.

I stamped four of the circus dogs with black ink onto white card stock and fussy cut them out.  I have a fun collage sheet with lots of different size and shapes of witches hats so cut out four of them.
My background is a piece of Halloween scrapbook paper edged with black ink and layered with a white panel.  I glued a witch hat to each of my circus dogs and then affixed them with foam tape to my card front.  I added a bit of black trim to the top border, the word "boo" and some bats scattered about.  That's it!  Easy peasy but lots of fun.

Try you hand at entering this fun challenge for a chance to win some free stamps from Lost Coast Designs and/or Carmen's Veranda!


Monday, October 12, 2020

Edgar Allen Poe


Hi again from Laurie with another Halloween project as part of the month long Halloween extravaganza over at the Lost Coast Portal to Creativity.  Every day a new post from one of the Design Team Members, and I'm up for today, the 12th of October.

This little card was made with the Edgar Allen Poe stamp from Carmen's Veranda and the Spiderweb Background stamp from Lost Coast Designs.

I started with a Gelli print in my box of prints that features turquoise and orange acrylic paints.  Using StazOn black ink, I stamped the spider web background and cut out my front piece. I layered this with white and turquoise panels.

Next I stamped Edgar with black ink onto white card stock and cut him out.  I colored his face with some flesh toned Copic markers and attached him to the bottom of my card front.  I looked up some Poe quotes online and found this one, which seemed to fit his melancholy expression.  I printed it, cut it out, edged in in black and affixed it as shown.

Please join us with your rubber stamped creations during this fun, fun month of October!


Saturday, October 10, 2020

 These photos are of my monthly project for Ephemoire using the products list. This is a tag booklet the pages of which are envelopes made using my envelope punch board. The top flap of each envelope is cut off to create a pocket, and each pocket holds a tag. Front and back covers are made with chipboard covered in paper. http://etsy.com/shop/ephpop

http://facebook.com/ephemoire

Tuesday, September 22, 2020


Hi again, and here is a card I made for the Lost Coast Portal to Creativity newest challenge: Man Cave.  This challenge runs until the end of September, so you still have lots of time to enter.  Just one rule:  your entry must include some rubber-stamping.

For this card I used the Waltzing Cowboys stamp from Lost Coast Designs and the All Together clear stamp from Carmen's Veranda.  Be sure to check out the newest clear stamps at Carmen's Veranda - they will for sure put a smile on your face!

This was so simple.  I stamped my cowboys using black ink onto a piece of coffee dyed paper.  I tore around the edges and used some Vintage Photo Distress Ink to age the edges.  My background is a piece of map of Yellowstone Park, and I cut that to fit my central image and inked the edges of this as well.

I used my sewing machine and black thread to stitch around the edges of my stamped panel, stitching it in place to the center of the card front.  Next I stamped my sentiment onto a scrap of coffee stained paper and stitched it with black thread as well.  I positioned it at the bottom of the card and fastened it with foam tape.

That's it!  I love the vintage-y look that coffee stained paper gives to any project, and it's so easy to do.  If you haven't tried it yet, you will love the results!


Thursday, September 10, 2020

Coat Lady


 Hi again with a project for the "Ladies' Night" challenge going at the  Lost Coast Portal to Creativity through the 14th of September.  I have made a card for this one using the  Coat Lady stamp from Lost Coast Designs and the Bottom of Wine Bottle clear stamp from Carmen's Veranda.


I have had this Gelli print in my box of prints for a long time and have never used it.  I never seemed to find the right project - until today!  I made this during a day long class I took, and I know it was an example of letting paints build up on your plate and not cleaning after each print.  

I stamped my Coat Lady with black ink onto white paper and cut her out.  I added a little color to her face, hat and clothing with some Copic Sketch Markers.  I cut my background piece into a 
long-ish shape and layered it with a white panel.  Coat Lady got attached at the bottom of the panel, and my stamped sentiment at the top, using foam tape for both.

Easy and fun!!


Monday, August 24, 2020

Anything Goes: Silhouette


For the latest Lost Coast Designs challenge, I have created this simple card using the Grunge Flower Profile stamp from Lost Coast Designs.

I created a collage master board a few weeks ago on an 8 1/2" by 11" piece of white card stock and like to keep these on hand as you can cut out sections to make backgrounds for smaller projects.  So this background is from that master board.  I stamped my image with black ink onto a piece of a manilla file folder and cut it out.  I attached it as shown to my background and layered that with a piece of black card stock.  Very simple but I think this stamp is so elegant that it speaks for itself.


Monday, August 10, 2020

Cat's Eating Turnips

Hi from Laurie on this summer day in August.  I hope this finds you all healthy and safe and staying cool!

I have another project today for the "Let's Go Vegetarian" Challenge at The Lost Coast Portal to Creativity going on now through the 14th of the month.  This one uses the Katzelkraft Striped Cat stamp and the Sketchy Lily stamp, both from Lost Coast Designs.

My background paper is a Gelli print I had on hand that uses green and yellow acrylic paints and several stencils.  I edged this with green Distress Ink.  Next I stamped my cat onto a small piece of scrapbook paper using black ink and cut him out.  I stamped his face again on white paper and cut out the eyes, attaching them over the original stamped image.  I affixed him to my card front with some dimensional tape.

I stamped my flower onto a yellow scrap with black ink and cut it out.  This was attached to the upper right corner as shown, again using foam tape.

Finally I cut out a little turnip and placed it with foam tape so it appears that the cat is holding it aloft.  I layered my card front with white then yellow card stock, and that's a wrap!

You don't have to be a vegetarian to join in on the current challenge.  Just think trees, flowers, fruits, vegetables - use your imagination and be creative!  You could win some free stamps!!
Be sure to use some rubber stamping somewhere in your projects.

Thursday, August 6, 2020

Vintage Medical Journal made from manilla file folders

Below are photos of a vintage medical journal that I made using manilla file folders.  This was a technique I learned from a You Tube video for a SwapBot swap.  I liked this journal so much that I made this one as my August Ephemoire project using collage sheets, ephemera and papers from the Ephemoire Etsy Shop http://etsy.com/shop/ephpop


Saturday, August 1, 2020


Happy August all!  I hope this finds you healthy and happy and enjoying this strange summer as best you can.  There is a new fun challenge that starts today on The Lost Coast Portal to Creativity   called Let's Go Vegetarian.
Think flowers, plants, leaves - or in this case, vegetarian dogs!

For this card I used the Coffee Chihuahua stamp from Lost Coast Designs and the Eat Cake clear stamp from Carmen's Veranda.

My first step was to stamp my Chihuahua with black ink onto a piece of a background that I had left over with a stenciled design in a light brown color.  I fussy cut him out and colored his collar red and whitened his teeth.  I then restamped his head onto white card stock and cut out the eyes, which I superimposed over the original stamped eyes.  When I cut him out, I deliberately cut out the cup of coffee he was holding so I could give him a head of lettuce to hold instead.

The background is simply a piece of tan and white scrapbook paper that I edged with brown ink and layered with a white panel.  I glued my Chihuahua and his veggies to the card front, stamped the sentiment in black ink and cut it out, edging it with black ink and cutting the words apart.  I glued them as shown, and it's a wrap!

So have fun "going vegetarian" this month and enter the challenge for a chance to win some free stamps!


Monday, July 27, 2020

Christmas in July!!


I made this card for the Lost Coast Portal to Creativity "Christmas in July" challenge going on during the last half of July.

I used the Herald Angels stamp from Lost Coast. I stamped the image onto white card stock with black ink and cut it our.  I added a bit of color with some Copic Sketch Markers.  I created my background by heat embossing a decorative swirl stamp with clear embossing powder onto white card stock.  I then applied several shades of blue Distress Ink sprays and blended those in.  Final touch was to sprinkle some silver glitter over the card front.


Tuesday, July 7, 2020

Japanese Waterfall Album


 Here are photos of a Japanese themed waterfall album that I created using papers, collage sheets and ephemera from Ephemoire Shop.